Trik - Trik Photoshop

1. Buka gambar
2. Pilih menu Filter > Extract


3. Klik tombol Edge Highlighter
4. Atur parameter tombol

5.Seleksi area gambar yang akan di pertahankan dari proses extract


6. Klik tombol Fiil
7. Klik area gambar yang telah terpilih


Klik OK. Perhatikan bahwa gambar di luar area seleksi akan dihapus sehingga gambar tampak transparan dan desain pada layer bacground akan tampak


MEMBUAT KESAN ENERGIK DENGAN RADIAL BLUR

1. Buka gambar dan seleksi gambar motor
2. Tekan ctrl+i untuk membalikan area seleksi


3. Pilih menu filter > blur > radial blur


4. Atur para meternya untu mengaburkan gambar dan klik ok

mengganti warna dengan Hue


MEMBERI KESAN GERAK DENGAN MOTION BLUR


  • Buka gambar dan seleksi gambar mobil


  • Tekan ctl+j untuk menduplikasi gambar yang terseleksi ke layer 1
  • Tekan ctrl+D dan pilih layer background
  • Pilih menu Filter > Blur > Montion Blur
  • Atur para meter untuk mengaburkan gambar Dan klik Ok

MEMBERI FOKUS FOTO DENGAN GAUSSIAN BLUR

MEMBERI FOKUS FOTO DENGAN GAUSSIAN BLUR
  • Buka photo dari HDD/Media penyimpanan lainya. Lalu lakukan penyeleksian pada foto tersebut
  • tekan Ctri+I untuk membalikan area yang telah terseleksi
  • Pilih menu Filter > Blur >gausian Blur
  • Geser slide radius untuk mengaburkan gambar yang sesuai dengan selera anda.
  • telan Ctrl+D untuk menghilangkan garis seleksi

Rabu, 10 Desember 2008

MENDUPLIKASI GAMBAR DENGAN CLONE STAMP
1. Buka dua file gambar dari media penyimpanan
2. Klik Clone Stamp
3. Atur Parameternya pada baris option 4. Tekan Alt Dan Klik Pada gambar yang akan diduplikasi

Kamis, 04 Desember 2008

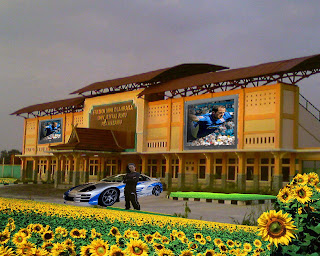
Memanipulasi Photo stadion unri menjadi stadion modern
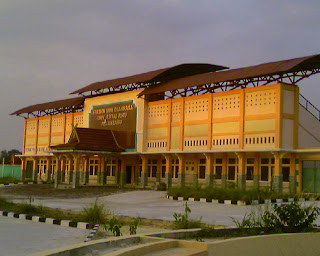
  • buka dua atau lebih photo dari HDD/Media penyimpanan lainya.
  • Tekan ctrl+A untuk menyeleksi seluruh photo
  • Tekan ctrl+C untuk menyalin area yang terpilih
  • Perkecil ukuran kanvas dengan perintah menu Image>Canvas Size
  • Aktifkan kotak centang Relative dari lebar kanvas(width)= -1 inchi
  • klik proceed untuk memperkecil ukuran kanvas
  • Tekan ctrl+V untuk meletakan objek hasil salinan pada layer baru
  • tekan Ctrl+T untuk memilih objek atur posisi photo stadion sehingga tampak lebih simetris
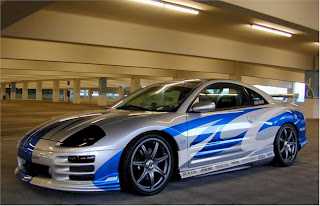
  • buka fhoto ke-2 dari cd/hdd
  • klik Lasso tool untuk menyeleksi gambar
  • klik move pada toolbar kemudia geser gambar mobil yang masih terseleksi ke dokumen berisi f hoto stadion
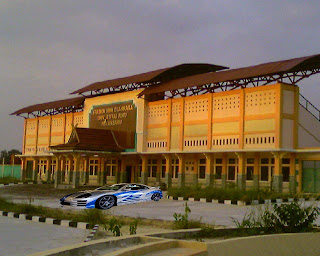
  • serelah gambar pinda tekan Ctrl+T untuk mentransformasi ulang gambar mobil yaitu dengan mengatur posisi,rotasi dan sisi prepektif gambar mobil sehingga tampa seperti gambar dan tekan enter
  • ulangi seperti langkah dia atas dan akan menjadi tampilan stadion yang seperti ini
0 komentar

Komentar

Postingan Populer

ACDSee Pro 5 What's New in ACDSee Pro 5 Feel the difference in your photography ACDSee Pro 5 delivers more features photographers want, giving you even more control over your photography workflow. Photo Developing Enlarge + ACDSee Pro 5 sharpening Smarter Sharpening A new user-controlled edge detection mask slider lets you focus the sharpening effect more to edges and textures than non-textured areas. Enlarge + ACDSee Pro 5 split toning tool Split-toning Take your photos to the edge in either Develop or Edit mode using split-toning to create sepia or tinted black & white, Or add a tinted color to highlights and another to shadows to create a dramatic toning effect. Photo Editing Enlarge + ACDSee Pro 5 dodging and burning Dodge and Burn Target shadows, midtones or highlights for lightening or darkening with the Dodge and Burn tool, or selectively add vibrance, saturate or desaturate areas of interest. ACDSee Pro 5 drawing tools Drawing Tools Put your photos to work for you using drawing tools to add lines and shapes such as squares, circles and arrows to draw attention to certain elements in your image. You can also adjust the width, feathering and blending of your brush to create subtle or dramatic drawing effects. Special Effects Apply and fine-tune a range of pre-set effects quickly and easily with the Special Effects palette, now including: ACDSee Pro 5 special effects Lomo Effect Apply the popular Lomo effect to give an edgy, retro feel to your photos. Collage Effect Creatively display your photo in a collage of prints. Orton Effect Give an ethereal, pastel-like touch to your portraits and landscapes. Workflow Color Labels Use color labels to quickly identify groups within a large number of photos for processing. As your review your photos, quickly mark ones for different stages of your workflow. For example, assign files to color labels you have named such as upload, print, reject, develop or edit and then click a color label in the Organize pane to quickly display all of the files assigned to that label. Or use them in combination with the Group by, or Filter By features to refine your list. Color labels, like tagging, categories and ratings, are a way to set aside, organize, and group your photos without moving them into different folders. ACDSee Pro 5 color labels Enlarge + ACDSee Pro 5 Batch Export Tool Batch Export Tool Save a group of photos to your specifications faster than ever with the updated ACDSee Pro 5 Batch Export tool. The batch export tool allows you to create presets for easily exporting groups of files to specified folders, file names, formats, colour spaces and dimensions. Removing metadata in ACDSee Pro 5 Remove Metadata Use the Remove Metadata tool to keep your proprietary information private by stripping EXIF and IPTC metadata to protect the details of your locations, camera settings and equipment choices. Overview What's New Features System Requirements ACDSee Customer Pricing Already own an ACDSee product? Check your email for a promo code to get ACDSee Pro 5 for ACDSee Pro 5 sale for existing users US$239.99 US $95.99 Buy Free Trial Try ACDSee Pro 5 Download a FREE 30-day trial of ACDSee Pro 5 Download Trial